The agony of choice
After selecting the printer and unpacking, the first print is ready to be made. But what should we start with? With our own construction or with a 3D model of a used housing? Or do we take something completely different?
Fortunately, the Internet offers a variety of print-ready models, test patterns and examples. You almost get lost in the possibilities. From wall hooks to action camera mounts to cars and tools, there is really everything.
But “No risk, no fun.” We will take a specially designed housing, which should contain customer-specific electronics. So, the first print would be instantly productive.
Cura as a powerful tool
Ultimaker provides a very comprehensive software with Cura. It can be used to import various model formats, change the print alignment, parameterize the printer and “slice” the printed model, i.e. cut it in layers.
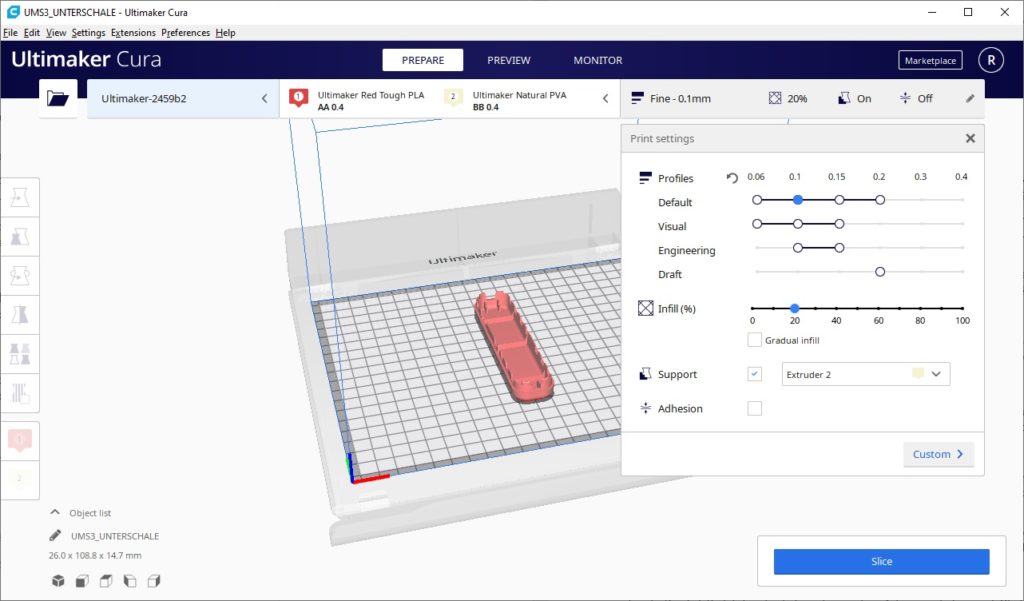
There is a simplified view for beginners. This allows you to start with the standard parameters for 3D printing. The different parameters become interesting later. First of all, we want to test how the printing process works.
STL as a basis for printing
As a model, we use an STL file of the required housing. STL files are now the standard for the output from CAD programmes to pass the data to 3D printers.
The objects to be printed – divided into triangles – are saved in the STL files. This decomposition is carried out by using so-called slicers such as Cura to create slices, i.e. layers. These layers correspond to the individual printing levels and printing processes. In this way, layer by layer is superimposed.
Cura offers even a preview, where you can see how the print head moves over the printing plate in the x- and y-axis and how it is shifted in the z-axis. Will it look like that in reality?

Layer by layer to the filament mixture
Now, we let the printer start working. And the printer moves promptly.
First, it automatically calibrates the alignment of the printing plate. It passes several points, checking how the z-axis has to be moved in order to press the printing plate against the print head.
After that, the printing starts. The black filament, which was supplied, materializes. A first layer is created, which is irregular. It seems that there are slight deviations from the ideal printing plate position or that not always the same amount of filament is applied.
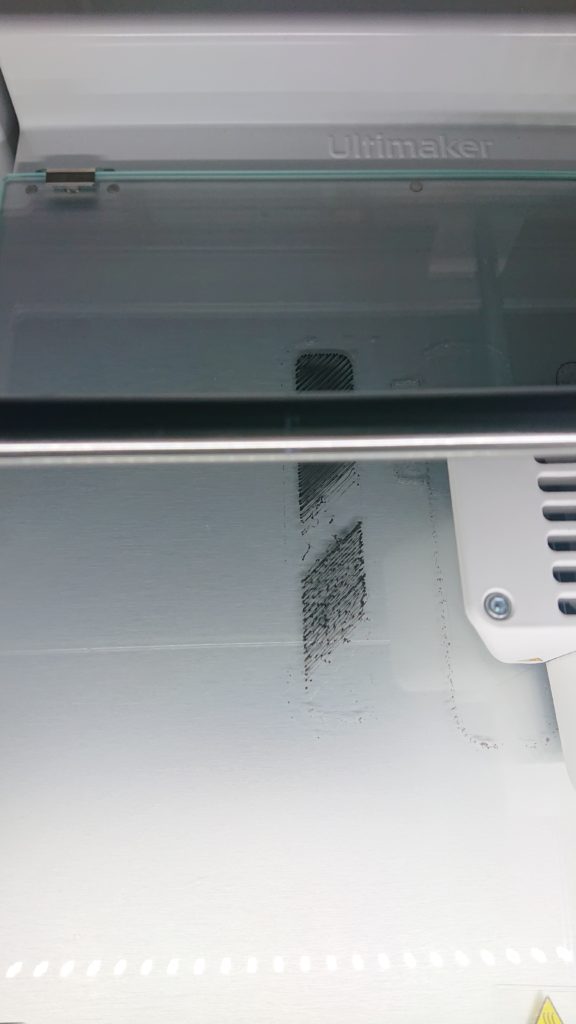
After applying the second layer, it looks better. So we let it go, it takes some time.
After a while, we check the printing process. Oops, what happened here? While one part of the model looks relatively well printed, the other part is completely useless. We cannot speak of a model. The printed filament threads are lying all over the printer. There is hardly a sign of adhesion between the two parts. What happened there?
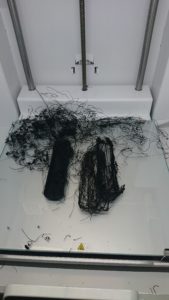
On closer examination, we noticed that the adhesion to the glass plate is not given. It was probably just to smooth when it was straight from the factory. That is why the glue stick was included in the delivery scope, aha!
We cleaned the glass plate quickly and applied the glue thinly. If it works better now?
Let´s do it again
A new printing attempt has now been started, the same procedure at the beginning and then the first layers. The adhesion to the glass plate seems to be given. We let it go unobserved.
After some time, we take a look and see that the print looks clean. Therefore, we let the printer finish printing. After a few hours, our first print is finally ready!
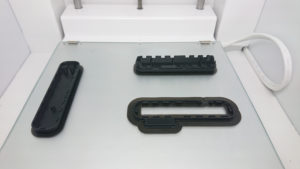
This looks really good and the parts fit also together! This is exactly what we wanted.
Further experiences with printing and settings will follow in the next parts.

