In this blog post our technical support, Erik Osse, would like to briefly introduce the messaging protocol MQTT. Thereafter, he will demonstrate how to configure the data transmission on the web page of our data concentrator MUC.easyplus in a concrete use case.
MQTT stands for Message Queuing Telemetry Transport.
It was developed predominantly for limited devices and networks with large delay and small bandwidth. MQTT is thus ideally suited for the machine-to-machine (M2M) communication. Hence, even battery-powered devices can be operated at locations with bad or almost non-existing radio access and transmit data efficiently in both energy consumption and data volume.
MQTT employs publish-and-subscribe messaging for information exchange. At the centre, and running the communication, is the broker. It picks up the data of a publisher on a particular topic and forwards these data to all subscribers of this topic. Consequently, sender and recipient do not need to communicate directly.
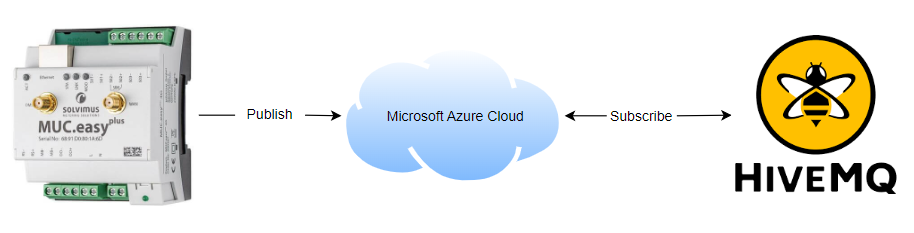
The data concentrator MUC.easyplus acts as publisher in this process. It collects the consumption data of connected meters and publishes the data in a topic on the broker. A subscriber to this topic could, for example, be a monitoring system or an energy management system that processes the data.
In my use case, I would like to capture the consumption data with the MUC.easyplus and publish them in the Microsoft Azure Cloud. I would like to subscribe to these data with a websocket client from HiveMQ and visualize them.
For that, I have created a free account for the HiveMQ cloud. Then, one can create a new cluster, equally free and simple to do. I opted for a cluster offered by the cloud provider Microsoft Azure. Under “Manage Cluster”, I can inspect the information on my cluster.

Prior to configuring the data transmission in the MUC.easyplus, I create a user MUC.easy with password in the “Access Management” within the HiveMQ cloud.
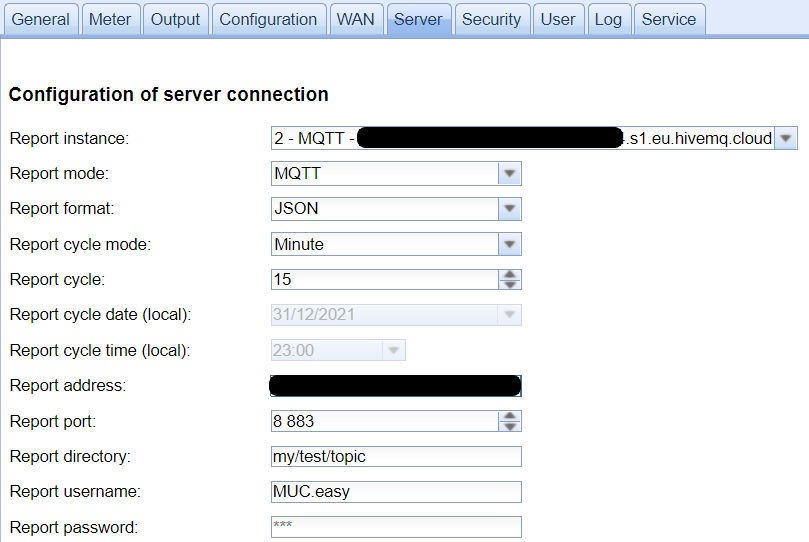
The data transmission is configured on the web page of the MUC.easyplus in the tab Server. When configuring the data transmission, I notice that I did not have the option to create a topic. As stated in the introduction, the publisher has to refer to a topic. This is like a path in an FTP or web server. It must be clear in which topic I would like to publish the data.
After a quick search, I learned that the topic can not be parameterized and should thus be “my/test/topic”. The data transmission is thus configured as follows:
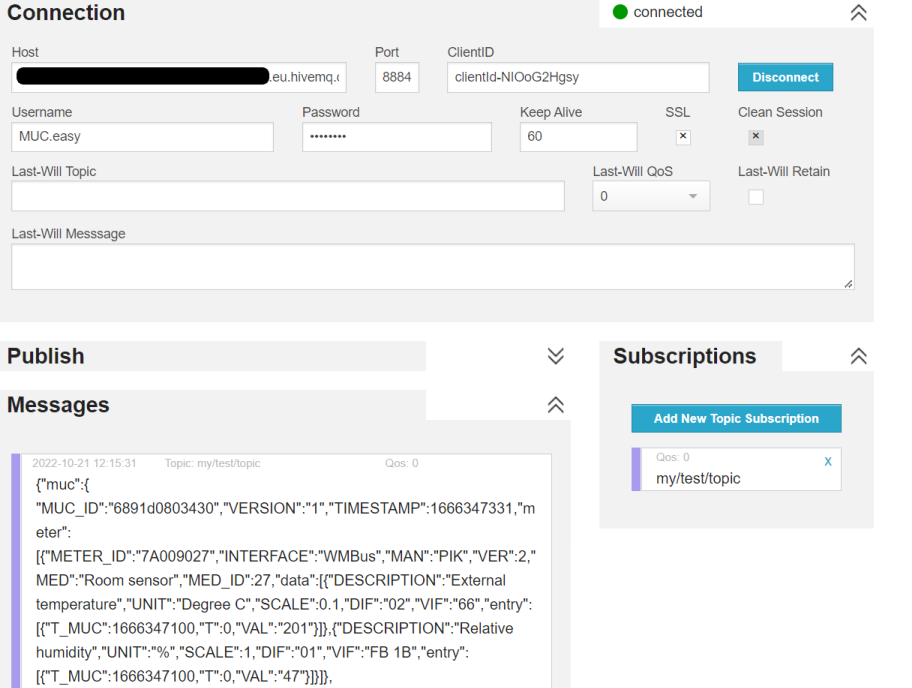
HiveMQ provides a websocket client to inspect the data published in the topic “my/test/topic”. This function renders my browser into a MQTT client. This avoids the need to create a system able to process and display the data. Further, I can see at first hand if the data transmission works as intended. I open the HiveMQ websocket client in my browser. In the field “Host” I paste anew the URL of the broker “xxx.s1.eu.hivemq.cloud”. The port to use for the websocket client is indicated in the connection settings of my cluster, and I insert that. Lastly, I fill in the username and the password and connect.
Once the connection to the broker is established, I click under “Subscriptions” on “Add New Topic Subscription” and copy the topic “my/test/topic” in the field provided.
Thereafter, all incoming messages to this topic are listed in real time.
In this blog post we have given a basic insight into the protocol MQTT and, using a concrete use case, how to configure the data transmission via MQTT in the cloud .
If you intend to use MQTT in upcoming projects or have questions on data transmission in general, you are welcome to contact us in Support by phone (+49 3677 7613066) or e-Mail (support@solvimus.de).

